Updated: 14 October 2026 · EuroVan Shop
Starting a self-build campervan is exciting, but it is also a project where the order of work matters. A little planning before you cut, wire or build can help you make better use of the space, avoid redoing work and create a van that suits the way you actually travel. This van conversion guide takes you from choosing a layout to your first trip, with practical prompts for the main decisions along the way.
In short: Plan your layout and budget, choose and prepare a sound van, then fit windows and skylights before insulation. Add ventilation, insulation and electrics; fit the fridge and kitchen, water system and heating; then build the furniture and bed. Finish by checking your UK paperwork, testing every installation and taking a careful first trip.
Step 1: Plan and design your conversion
Before buying materials, decide how you expect to use the van: occasional weekends, longer trips or regular living on the road. Think about how many people and pets need to travel and sleep in it, and which facilities matter most. A fixed bed, a convertible seating area, a compact kitchen, a toilet and a shower all use valuable space, so prioritise rather than trying to fit everything in.
Measure the load area and make a scaled floor plan. Mark the wheel arches, doors, structural pillars and planned openings, then sketch in the bed, kitchen, storage and main routes through the van. Check that cupboards and doors can open and that the bed works for the people using it. Make a list of appliances and materials before setting a budget. Overall cost and build time depend on your van, specification and skills; use the cost guide to help plan without assuming every build is alike.
Read next: Plan your conversion (checklist) · Van conversion cost · Convert a van on a budget
Step 2: Choose and prepare the van
A good self-build campervan starts with a base vehicle that is suitable for your layout and in sound condition. Consider the load space, payload, access, service history and condition, and get a mechanic to inspect it if you are unsure. Remember that furniture, water, equipment and passengers add weight, so do not plan around the empty van alone.
Remove unwanted coverings, brackets and fittings, keeping anything you may reuse. Decide whether to keep or remove the bulkhead only after considering passenger safety, access, heating and how the change affects your layout. Clean the interior thoroughly and investigate damp or water ingress before covering anything up. Inspect the floor, doors, arches and seams for rust. Deal with corrosion appropriately and seek professional help if it affects structural areas; do not simply conceal it behind cladding. Confirm the van is mechanically ready for the extra use and weight a conversion may bring.
Read next: Choose a base vehicle · Keep or remove the bulkhead · Common conversion mistakes
Step 3: Fit windows and skylights
Plan window and skylight positions while the interior is still open. Their locations affect light, views, privacy, furniture and airflow, and openings must avoid structural pillars and other obstructions. Check the dimensions and fitting requirements of the specific products against the van’s panels and your intended internal finish. A paper template can help you check placement from both inside and outside before committing to a cut.
Follow the product instructions for marking, cutting and fitting. Protect yourself and the van when cutting; treat and protect exposed metal edges against corrosion. Fit the correct counter-frame or fixing arrangement for the product and panel thickness, and use a compatible sealant as directed. Allow sealant to cure in line with its instructions, then check carefully for leaks. Windows and roof openings are the most important work to complete before insulation: fitting them later can disturb finished linings and insulation, and make access more difficult.
Read next: What size windows / placement · How to fit a campervan window · Campervan windows (collection)
Choose windows for your build
Compare campervan windows and plan the right openings before you move on to insulation and interior finishes.
See the windowsStep 4: Add roof ventilation
Plan ventilation alongside your windows, not as an afterthought. A roof vent can help move warm, moist air out of the living space, while opening windows can provide a route for fresh air to enter. The best arrangement depends on the van, roof layout and how you intend to use the space. Consider cooking, sleeping and showering when deciding where air needs to move, and check that the vent will not clash with roof ribs, wiring, solar panels or interior furniture.
Choose a vent suited to the opening and roof construction, and follow its fitting instructions, including the specified sealing and fixing method. Protect any cut metal edges and check the seal after fitting. Ventilation helps manage condensation, but it does not replace good insulation, safe appliance use or sensible moisture control. Plan to air the van regularly and deal promptly with leaks or persistent damp.
Read next: Ventilation and condensation FAQ · Roof vents (collection)
Step 5: Insulate the van
Insulation can make the interior more comfortable, but there is no single material or method that suits every van. Compare materials for fit, moisture management, acoustic performance and installation requirements. Prepare the metal first: it should be clean, dry and free from untreated corrosion or water leaks. Take care around wiring, door mechanisms, drainage paths and any areas that may need future access.
Fit insulation neatly to the walls, roof and floor as appropriate for your design, avoiding gaps where practical and following the material maker’s guidance. Do not block factory drain holes or ventilation routes, and do not assume that adding a vapour barrier is appropriate for every material and build-up. Plan the wall and ceiling finishes at the same time, including how they will be fixed securely. Insulation and cladding add weight and reduce usable space, so account for both in your layout and payload planning.
Read next: Van insulation materials · Insulation (collection)
Step 6: Plan and install the electrics
Start by listing each electrical item, how it will be powered and how often you expect to use it. A typical 12V setup may supply lights, a fridge, a water pump and device charging. Battery capacity and charging options depend on your usage and equipment; possible charging sources include driving, mains charging and solar. An inverter changes battery power for suitable mains-voltage appliances, but it affects system design and should be selected for the loads you actually intend to run.
Draw a circuit plan before installing anything. Use correctly sized cable, suitable protection for each circuit, secure connections and a main isolator. Keep wiring protected from sharp edges, heat, moisture and moving parts. Batteries and charging equipment need secure, appropriate installation. Electrical systems can create fire or shock risks if poorly designed or fitted, so use a competent professional if you are uncertain and have the finished installation checked before relying on it.
Read next: Electrical system guide · 12V wiring diagram · Electrical kits (collection)
Step 7: Fit the fridge and kitchen
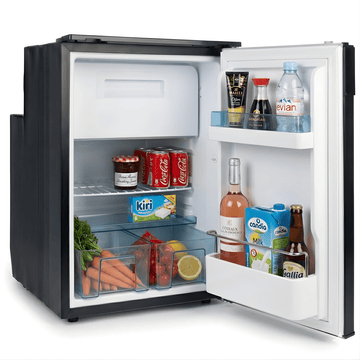
Set out the kitchen to make everyday tasks convenient without blocking doors or walkways. Allow for the fridge’s ventilation and installation requirements, and check that its door can open fully in the planned position. Choose an appliance to suit your electrical system and travel habits rather than selecting by size alone. A sink, worktop and storage also need space, so use your layout drawing to check clearances before building cabinets.
Secure the fridge and kitchen units so they cannot shift while driving. If you include a hob or other fuel-burning appliance, follow its installation and ventilation instructions and have work checked by a suitably qualified person where required. Keep combustible materials and wiring clear of heat sources. Plan access to connections and service points rather than sealing everything behind permanent panels. Test the kitchen components once installed and before loading cupboards for travel.
Read next: Choose a 12V fridge · Choose a sink · Campervan fridges (collection)
Step 8: Plan water, shower and toilet
Decide how much water you need for your style of travel and where fresh and waste water can be carried securely. A basic system may have a fresh-water container, a tap and a sink; an electric pump can provide a more convenient flow but adds an electrical connection and another component to maintain. Make sure tanks, pipes and fittings are accessible, protected from damage and secured for travel. Consider how you will fill, drain and clean the system.
A shower adds demands on space, water and moisture management, so compare an indoor arrangement with simpler alternatives before building one in. Choose a toilet that you can store, use and empty responsibly. Whatever the setup, check every joint for leaks and consider how exposed pipework will be protected from freezing conditions. Test the complete system before fitting finishes that would make leaks difficult to find. Never use a water system as a substitute for safe drinking-water handling.
Read next: 12V water pump · Install a shower · Camper toilets
Step 9: Choose and fit heating
Heating is a design decision to make before the furniture is closed in. Consider when and where you will use the van, the space available for the heater and its installation, ventilation and fuel requirements. Different heater types have different practical considerations; compare them against your layout and how you plan to travel. Do not choose a heater solely on the assumption that one type will suit every vehicle or use.
Follow the manufacturer’s instructions and any applicable requirements for installation, exhaust routing, fuel supply, clearances and ventilation. A heater must be securely mounted, and its exhaust must not discharge into the living area. If you are not competent to carry out the work, use a qualified installer. Check the finished installation and its controls before travel, and fit and maintain carbon monoxide alarms as appropriate to the appliances in your van. Never obstruct vents or air inlets.
Read next: Diesel vs gas heater · Ventilation and condensation FAQ
Step 10: Build the furniture and bed
With major openings and services planned, you can finalise the interior fit-out. Choose a bed arrangement that suits how often you will use the van and whether you need the daytime space for sitting, cooking or carrying equipment. A fixed bed is straightforward to use but occupies a permanent footprint; a convertible design can create flexible space but needs reliable, easy-to-operate components. Check the bed length and width for the people who will sleep there.
Build cabinets and seating around access to electrical, water and heating components that may need inspection or repair. Use materials and fixings appropriate for a moving vehicle, and secure furniture to suitable structural points. Avoid sharp edges and check that drawers, doors and loose items cannot open or shift while driving. Add curtains, cushions and other personal touches after the practical work is secure. Keep an eye on the total load as the build develops.
Read next: Common conversion mistakes · Security tips
Step 11: Check the UK paperwork
Before using the converted van, speak to your insurer and explain the vehicle’s modifications and intended use. Ask what information, photographs or evidence they need and do not assume a policy will cover changes that have not been disclosed. Keep records of the work, equipment and any professional installations, and make sure the vehicle remains safe and properly maintained.
Changing a vehicle’s description or classification with DVLA is a separate matter from building a campervan. Reclassification is optional and subject to strict criteria; completing a conversion does not automatically mean DVLA will change the vehicle record. Requirements and decisions can depend on the vehicle and evidence provided, so check current official guidance before applying. MOT requirements and the effect of modifications can also depend on the vehicle and work carried out. Get appropriate advice rather than relying on assumptions or informal interpretations.
Read next: Is it legal to fit windows (DVLA, MOT, insurance) · Security tips
Step 12: Final checks and first trip
Work through every system before setting off. Check that windows, skylights, vents, furniture, appliances and stored equipment are secure. Test the electrical circuits and controls, check water fittings for leaks and confirm that doors and drawers stay shut. Look for signs of water ingress around new openings, and make sure access panels remain available. If you have gas, heating or electrical equipment, follow its operating and maintenance instructions and have any uncertain work inspected by a competent professional.
Take a short local drive before planning a longer trip. Stop and recheck that the load and fit-out remain secure, then address any rattles, movement or faults. For an easier first outing, follow the 3/3/3 rule as a planning prompt rather than a strict requirement: keep the first trip manageable and leave room to adapt. Make a note of anything that needs adjustment, and check your vehicle, insurance and route arrangements before each journey.
Read next: The 3/3/3 rule · Security tips
Build order at a glance
| Step | What to do | Guide link |
|---|---|---|
| 1 | Plan layout, use and budget | Plan your conversion (checklist) |
| 2 | Choose and prepare the base van | Choose a base vehicle |
| 3 | Fit windows and skylights | How to fit a campervan window |
| 4 | Add roof ventilation | Ventilation and condensation FAQ |
| 5 | Insulate and prepare for cladding | Van insulation materials |
| 6 | Design and install electrics | Electrical system guide |
| 7 | Fit the fridge and kitchen | Choose a 12V fridge |
| 8 | Plan water, shower and toilet | 12V water pump |
| 9 | Choose and fit heating | Diesel vs gas heater |
| 10 | Build furniture and bed | Common conversion mistakes |
| 11 | Check insurance and vehicle paperwork | UK legal guide |
| 12 | Test the build and take a first trip | The 3/3/3 rule |
Frequently asked questions
What is the best order for a campervan conversion?
Plan the layout first, prepare the van, then fit windows and skylights before insulation. Add ventilation, insulation and electrics before the kitchen, water system, heating and furniture. Finish with paperwork checks, system tests and a cautious first trip.
Can I convert a van myself?
Many people complete a self-build campervan, but the work can involve cutting body panels, electrical systems, heating and other safety-critical installations. Take on only work you can do competently, follow product instructions and use qualified help or checks when needed.
Should I fit windows before insulation?
Yes. Plan and fit windows and skylights before insulating and lining the interior. This gives you better access to the panels, makes it easier to finish openings neatly and reduces the chance of disturbing completed insulation and cladding.
Do I have to reclassify my converted van with DVLA?
DVLA reclassification is optional and subject to strict criteria. A conversion does not guarantee a change to the vehicle’s description. Check current DVLA guidance and make sure you understand the requirements before applying.
How much does a van conversion cost?
It depends on the base van, materials, equipment, layout and how much work you do yourself. There is no single cost that applies to every build. Use the van conversion cost guide to think through the factors.
What should I check before the first trip?
Check that the fit-out and stored items are secure, test the electrical and water systems, inspect openings for leaks and confirm that doors, drawers and appliances are secure. Take a short drive first and recheck the build before travelling further.
Need a hand with your build?
If you have a question about choosing or fitting EuroVan conversion products, get in touch with our technical team before you start cutting or installing.
Ask our technical team